Creating SVG Templates
with Photoshop & Illustrator
Tutorial video
Here’s a tl/dr summary of the entire creation process:
What is an SVG in the first place?
SVG (Scalable Vector Graphic) is an image format like JPG or PNG, except that it’s based on vectors instead of pixels, meaning that it not only never suffers from quality loss when being scaled, but it also can be packed with information. And boy oh boy, are we packing those!
How an impcat SVG works
Here’s a short summary of the principle that keeps impcat running:
Every impcat image is a vector graphic file with a line of very specific layers. Each layer has its own function within the app. Some are mandatory, some simply won’t have a function if you skip them in your production:
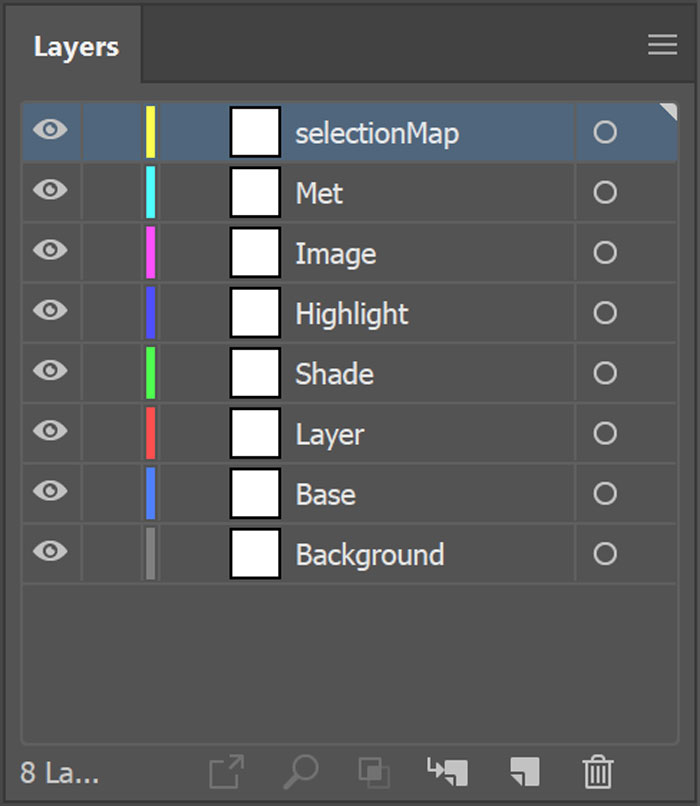
From bottom to top:
- Background: This layer is only relevant for the appearance of your image when being loaded. If your file won’t have a Background layer, the editable content of your image will be white instead of a custom colour when freshly loaded.
- Base: Mandatory. Without this layer your image won’t have any foundation colour.
- Layer: Only neccessary if you want layering effects in your image. Requires an image mask (see 1.2 below).
- Shade: Only neccessary if you want shading effects in your image. Requires an image mask (see 1.3 below).
- Highlight: Only neccessary if you want highlighting effects in your image. Requires an image mask (see 1.4 below).
- Image: Mandatory. Without this overlay your whole image will be basically blank, so all of this would be pointless.
- Met: Only neccessary if you want metallic effects in your image. Requires an Metallic filter image (see 1.5 below).
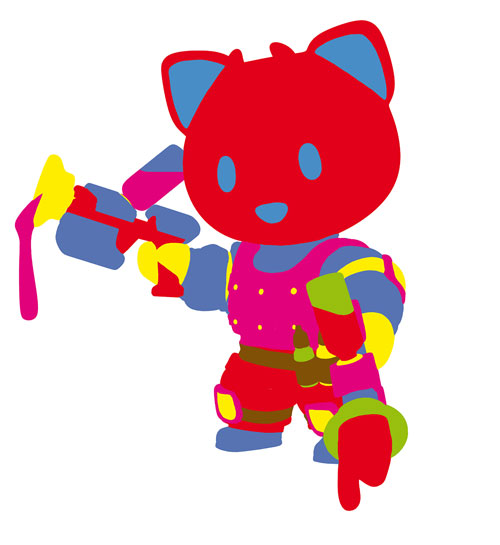
- selectionMap: Mandatory. These contents generate the colour preview in the first place. Without these the images wouldn’t change at all.
What you’re going to need
Every image template is being edited in 2 steps:
Editing the image contents, that we’re going to need for our SVG (which we’ll be doing in Adobe Photoshop) and building our SVG (which we’ll be doing in Adobe Illustrator).
We’ll be using Adobe CC 2019 for this tutorial, but technically all those steps should also work in older Adobe versions. We’ll be referring to shortcuts like Ctrl + I, which are commands for Windows PCs. If you’re using a Mac, simply replace Ctrl with Cmd. That’s the only difference.
Sample Files
In case you’d like to go through the actual Adobe files of this project, just download them here.
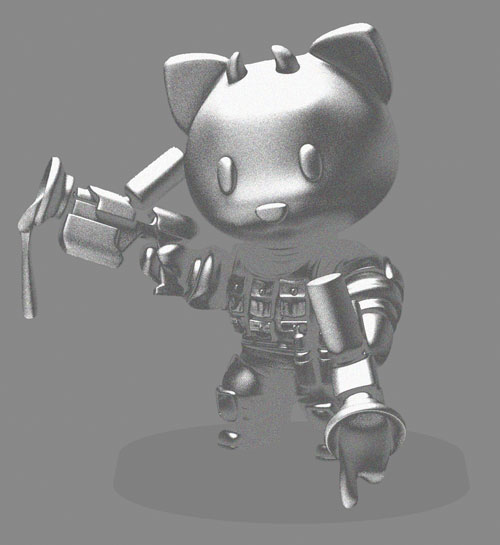
Choosing a photo
To get the best result, your photo should meet some conditions:
- There shouldn’t be any depth of field (since the vectors we’ll be working with have very sharp edges and wouldn’t go well with blurry images).
- The object(s) in the photo shouldn’t be too bright or too dark (best is a light grey colour and smooth lighting, so the shadows and highlights you want to extract are clearly visible)
- The object should be opaque. Glossyness doesn’t harm the process, but it shouldn’t be metallic or transparent.
- Specular highlights are the the lighting information we need to create metallic filters, so try to avoid fully diffuse surfaces, in case you want to include a metallic effect into your template.
- Also the source image should have a good resolution (we usually work with a width of 1080px, since this is sufficient for most mobile devices without generating a too large file size).
We’re going to need 6 images in total:


1. Image Editing
1.1 Creating an Overlay Image
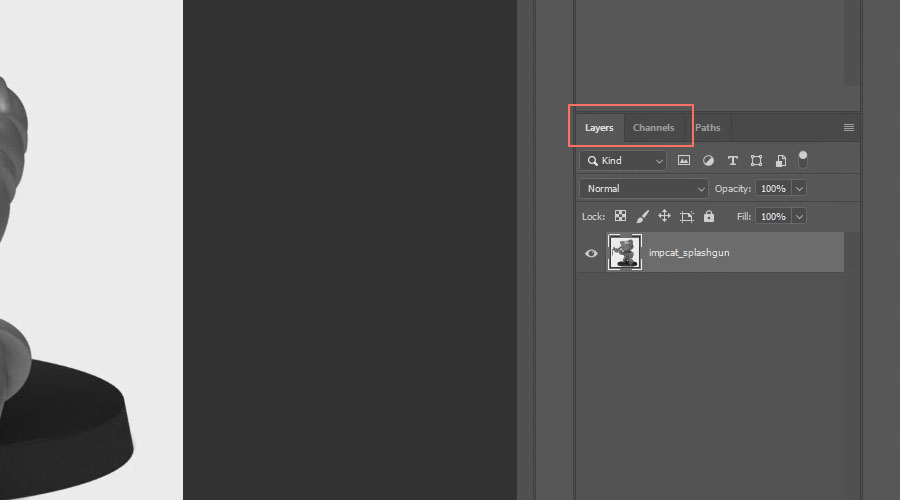
Open your image in Photoshop and make sure the Layers and Channels windows are active. If not, click on the Window tab and activate those two.
Create a layer that covers up everything that is NOT the model.
Press W to activate the Quick Selection tool and select the areas in your image you don’t want to be editable:

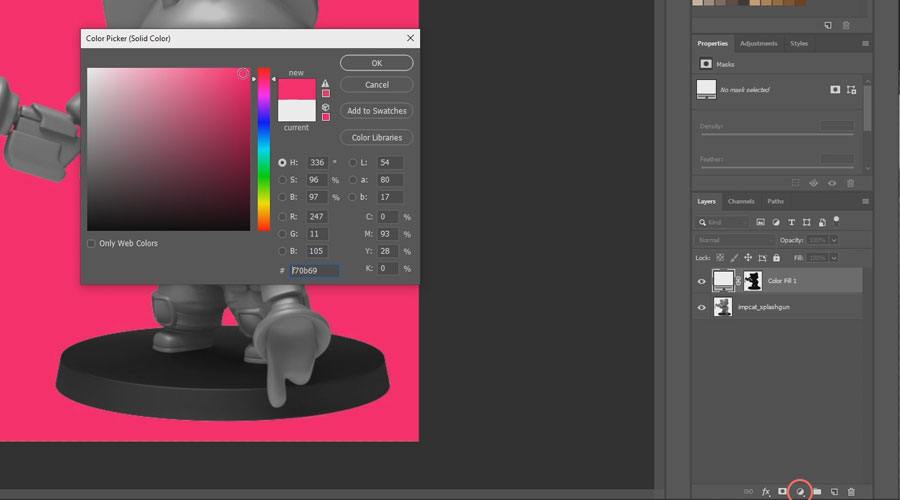
Once everything is selected, click the Create new fill or adjustment layer icon in the bottom section of the Layers window and pick Solid Color… . Pick a colour that is clearly distinguishable from the rest of the image and confirm by pressing OK. This step will create a colour layer with an editable opacity mask, based on your selection:
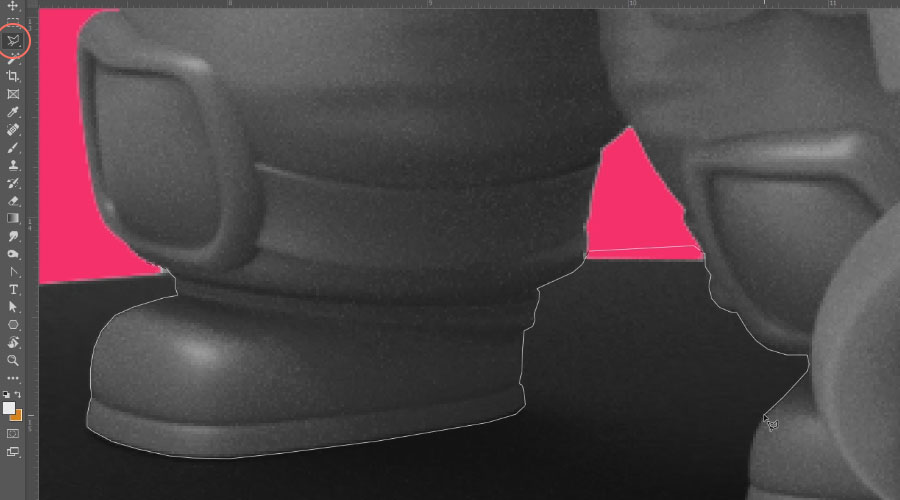
Press L to activate the Polygonal Lasso Tool. Use it to refine your selection and select additional parts of the image that the Quick Selection tool wasn’t able to get right:
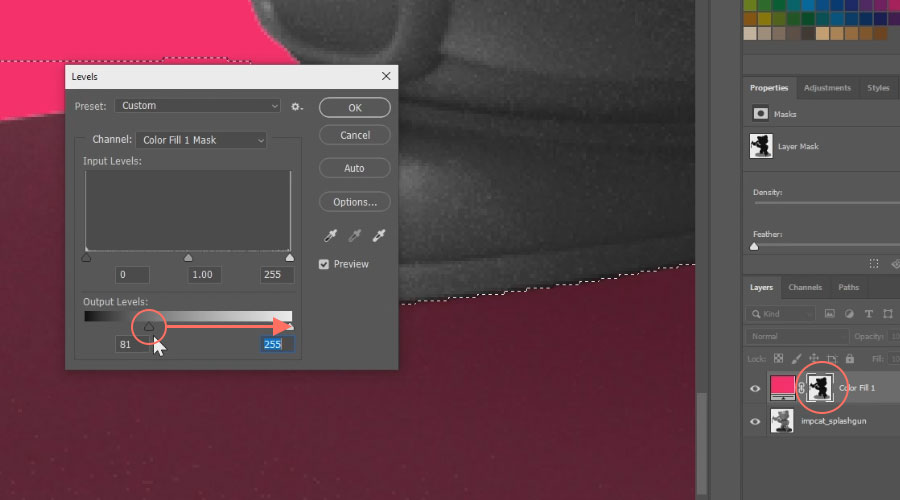
After selecting the additional parts, click on the Color Fill layer’s opacity mask icon and press Ctrl+L to open the Levels adjustment prompt, and move the bottom right slider from left all the way to the right. That will tell the layer’s mask to make these parts also fully visible:
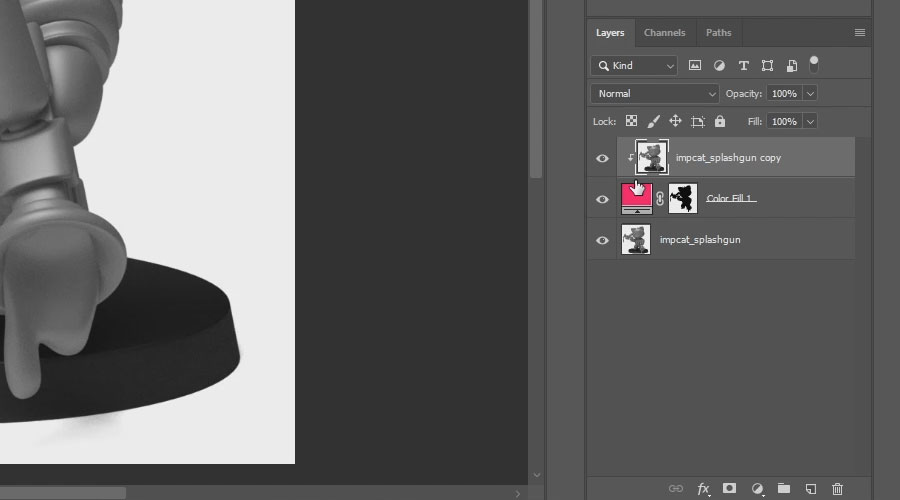
Grab your bottom layer and drag it to the top, while holding the Alt key. That will create a duplicate. If that image layer is called “Background“, you will need to convert it into a layer first, by double-clicking it and confirming with Enter. Then Alt-click exactly between the top two layers to turn the duplicate image into a Clipping Mask. This causes the image to only be visible where it’s parent (the Color Fill layer) is visible:
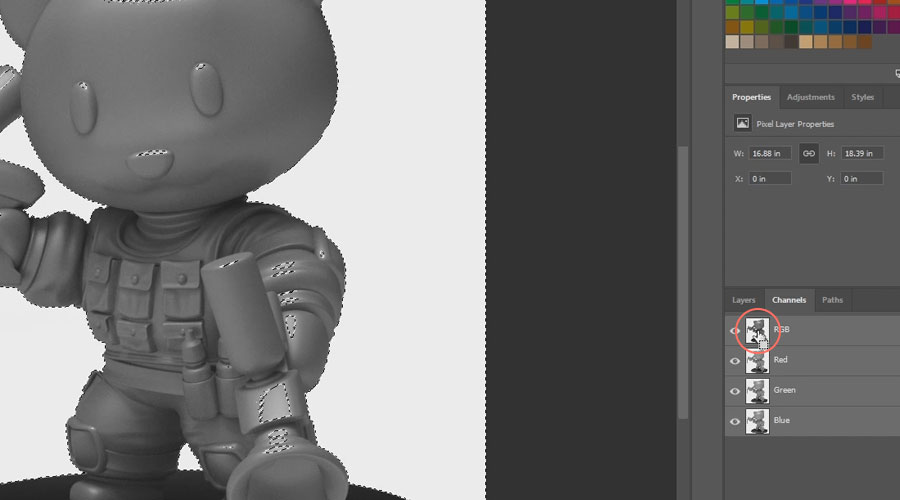
Next, we want to extract the lighting and shadow information of the model, so that any colour can inherit its original 3D effect. Switch to the Channels window and Ctrl-click the icon of the RGB channel. That will instantly create a selection of all lighting information, or in other words: it creates a selection based on every pixel’s brightness:
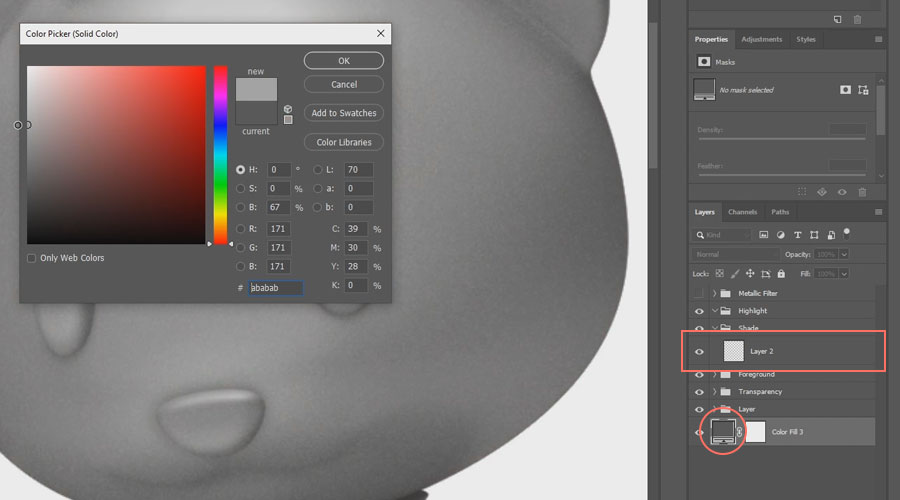
Go back to your Layers window and once more create a Color Fill layer, only this time pick a white colour. The automatically generated opacity mask of this layer will be based on the original image (i.e. white = fully opaque, grey = partially opaque, black = transparent):

Alt-drag the new layer one level below to create a duplicate. Select its opacity mask and press Ctrl+I to invert it. Then double-click the colour icon and change it to black. You should now have all the extracted information of lights and shadows of your model. Note that the lighting information should be on top of the shadow information:
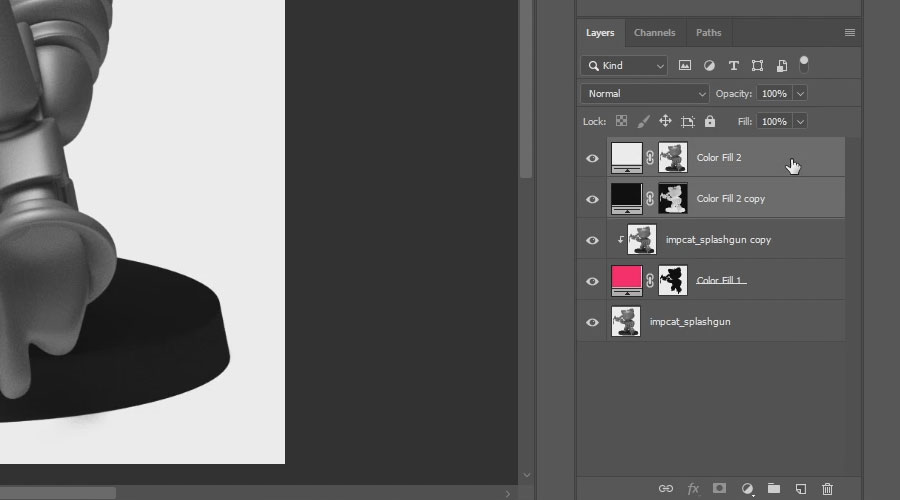
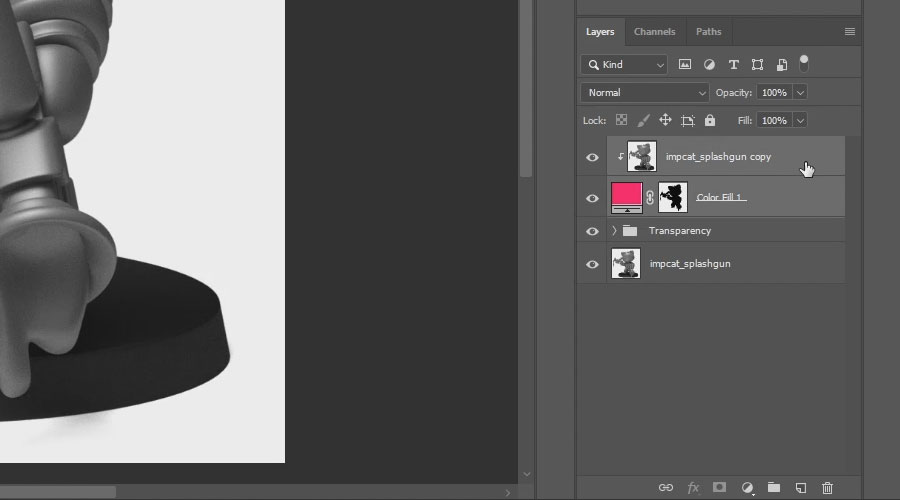
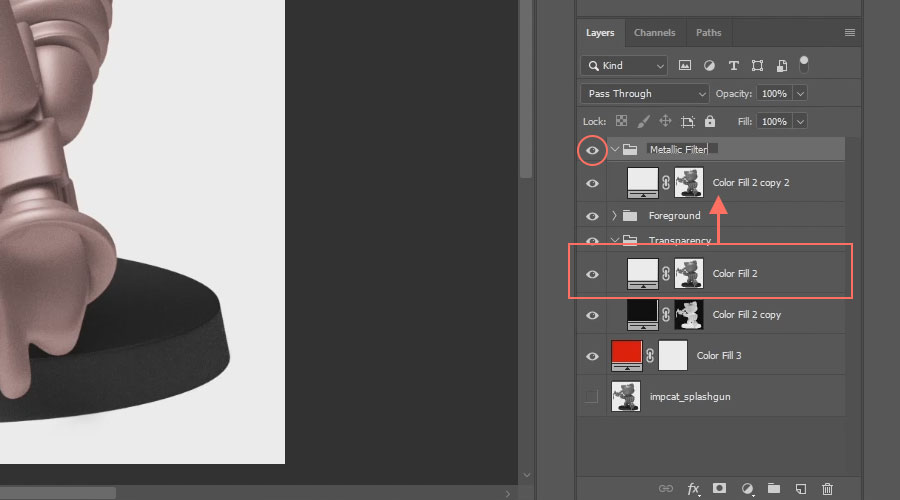
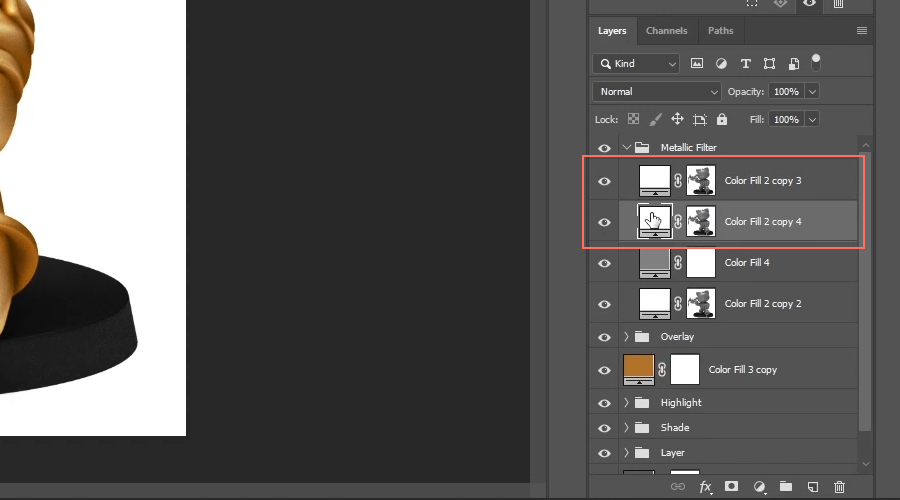
Take a second to keep your file clean. Shift-select the lighting and shadow layers and press Ctrl+G to group them, then rename that group to Transparency. Then select the image duplicate and Shift-select the Color Fill layer, group them, and rename the group to Foreground:
Click on the bottom layer and create another Color Fill, but this time a slightly darkened red. This will be first test for colouring the model (WOO!):
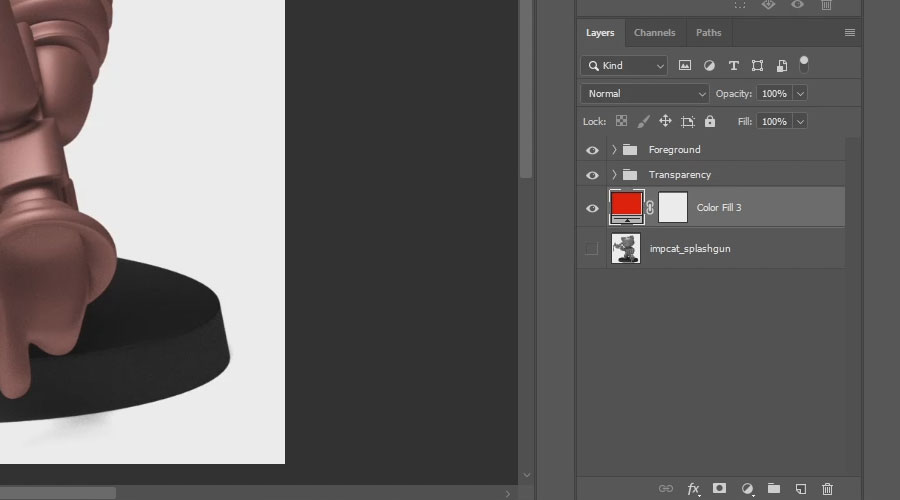
At this stage you might be wondering why the model is not really the red colour that you picked, which is correct. The reason is the contrast of your lighting and shadows, so let’s adjust that.
The lighting information will later also be required for the metallic filter, so before continuing, Alt-drag your lighting layer all the way to the top, to create a duplicate for later use. Wrap that duplicate in a “Metallic Filter” group by pressing Ctrl+G and hide the group’s visibility (we’re not needing it at this point):
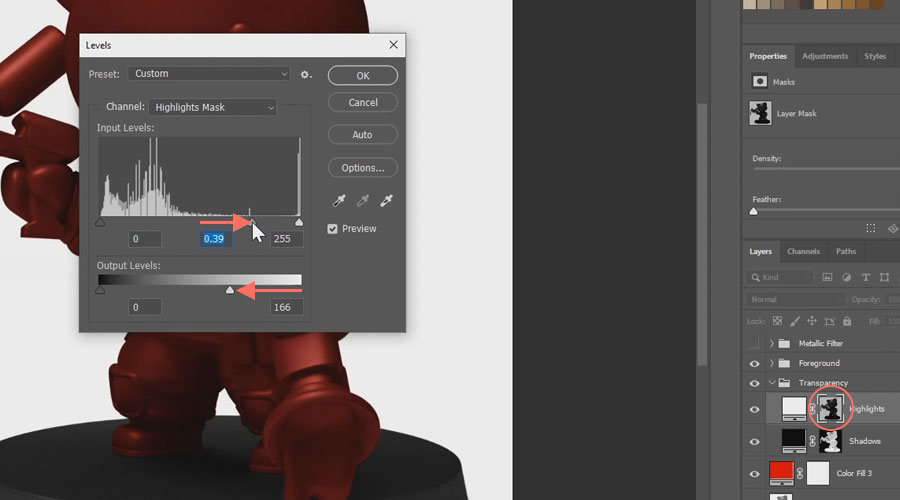
Click on the lighting layer’s opacity mask and press Ctrl+L. Drag the bottom right slider slightly to the left, to reduce the overall weight of white information, and the top middle slider slightly to the right, to reduce the weight of white information in the mid-tones, so the original red colour can shine-through a bit stronger:
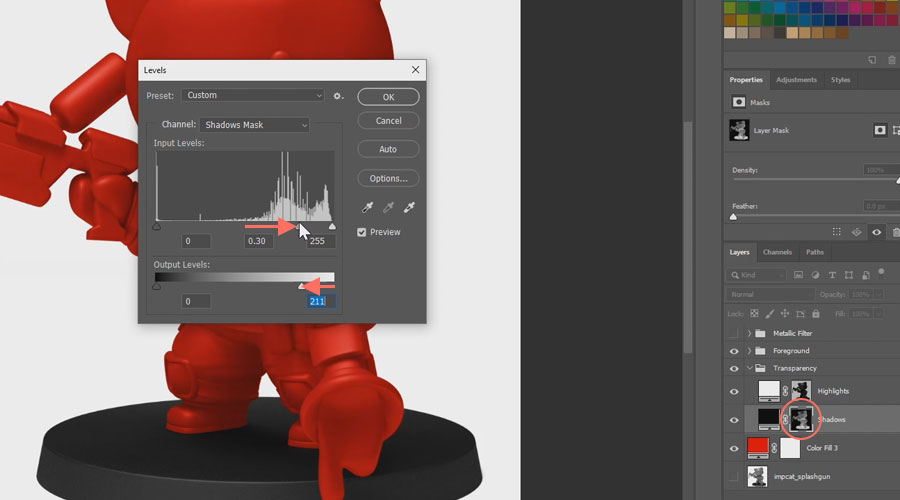
Do the same with the opacity mask of your shadow layer, except you need to move the bottom right slider only a tiny bit, or otherwise you’ll lose too much of the model’s depth:
From now on any colour you pick as a background should look like the model’s actual material colour:

Congratulations, your overlay image is complete!
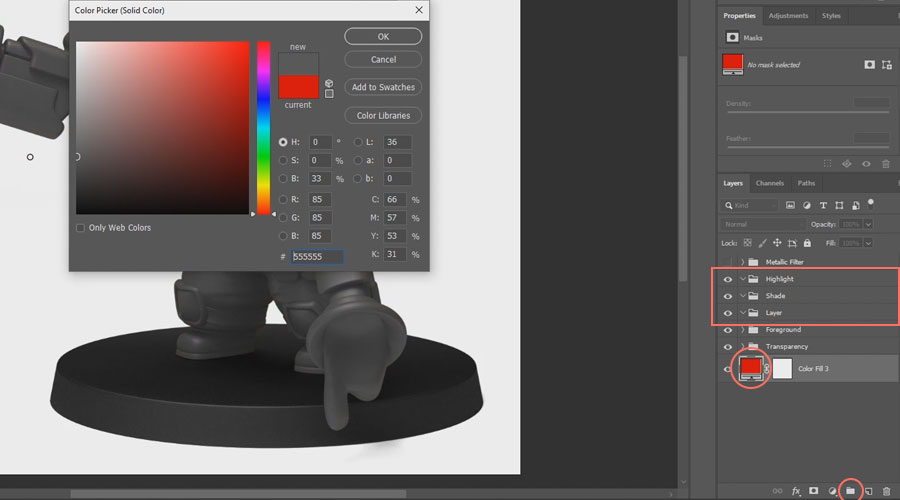
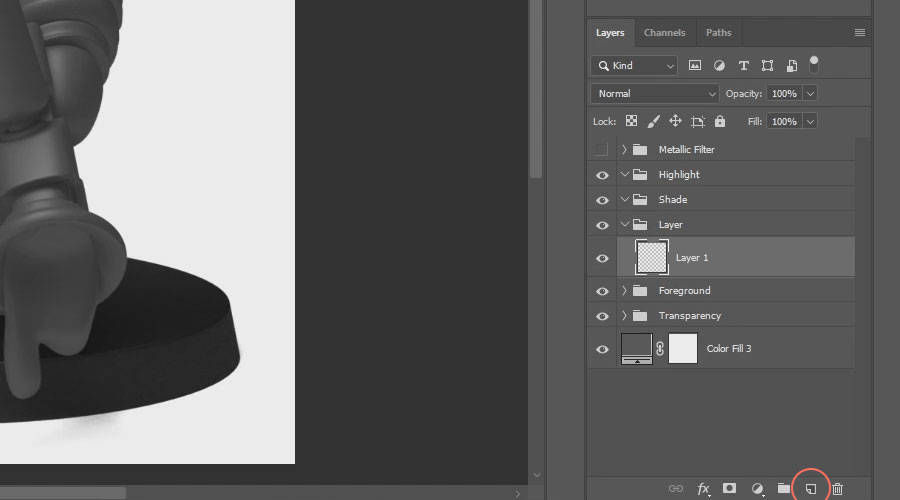
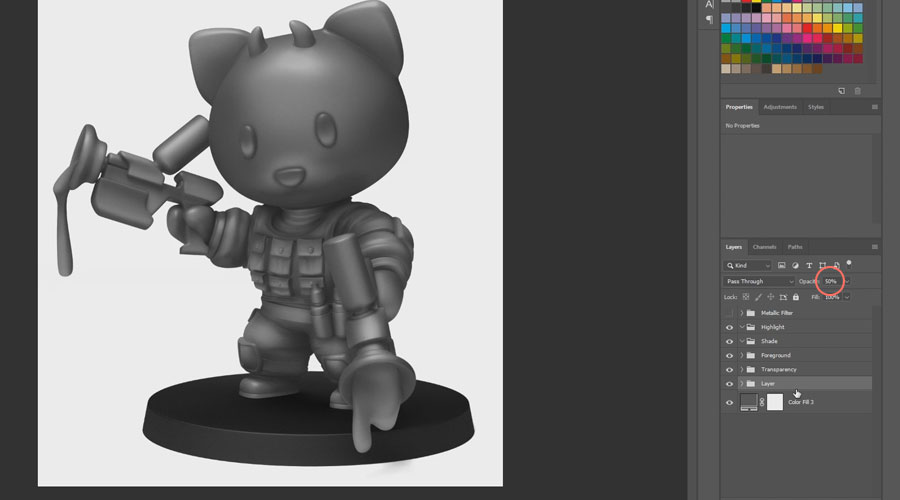
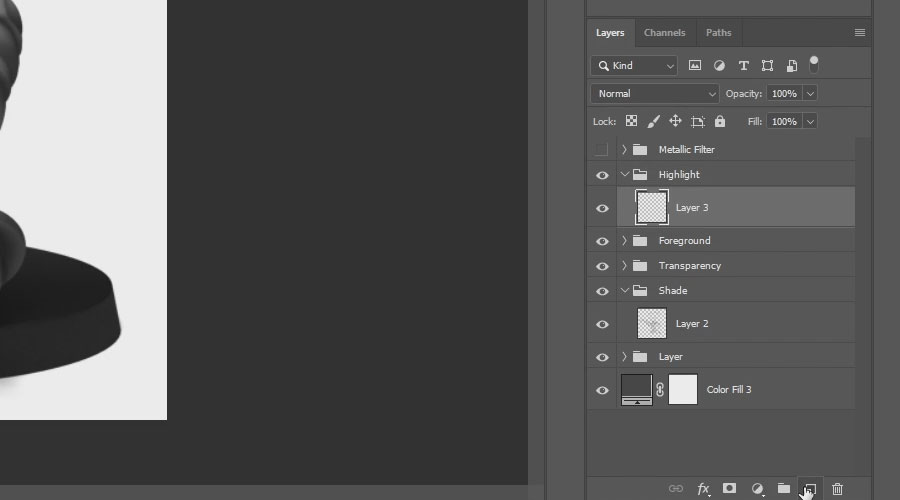
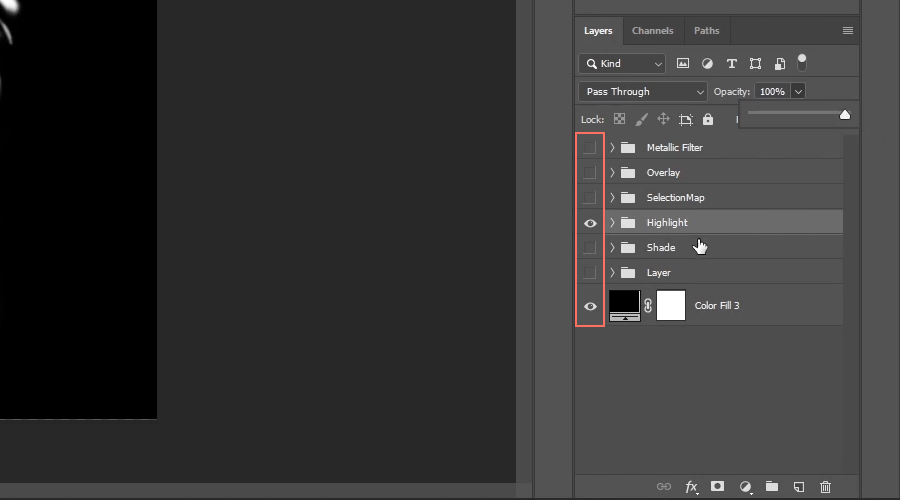
Now for the fun part: Create three new groups by clicking the folder icon at the bottom of the Layers window and rename them (from bottom to top) Layer, Shade and Highlight. Then double-click the icon of your red background colour and change it to a medium dark grey. Since we’ll be painting our effects with white, this will help us see our progress with a better contrast:
1.2 Creating a Layer Mask Image

Select your Layer group and click the Create a new layer icon at the bottom of the Layers window. here’s where we’ll paint our layer-level effects:
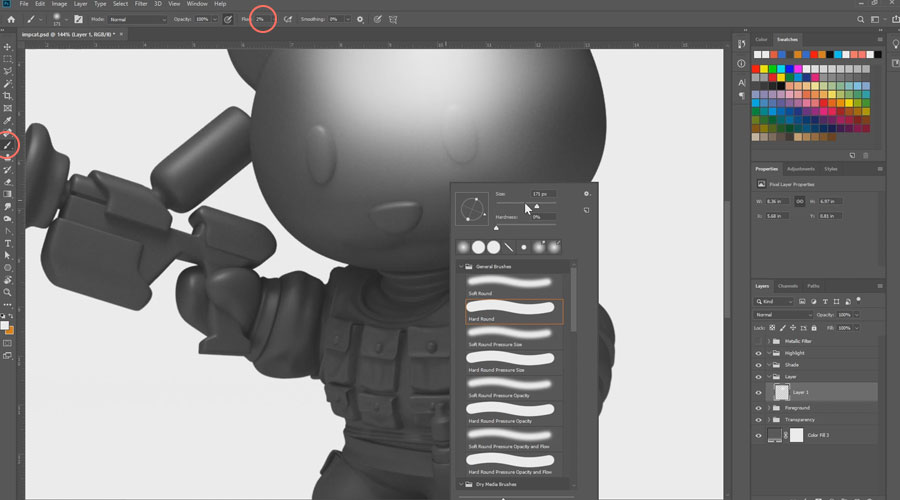
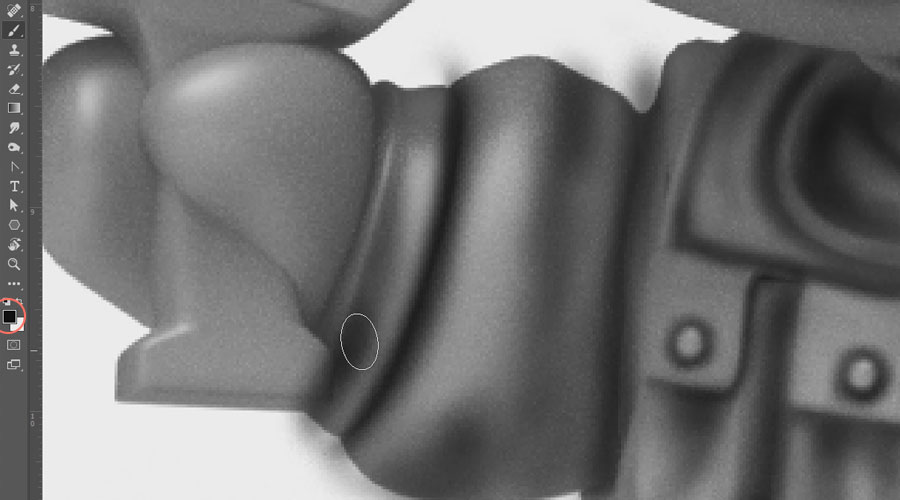
Press B to activate the Brush tool and set the Flow to around 2%. To adjust the size and softness of your brush, you can right-click on the image at any time, while the Brush tool is active:
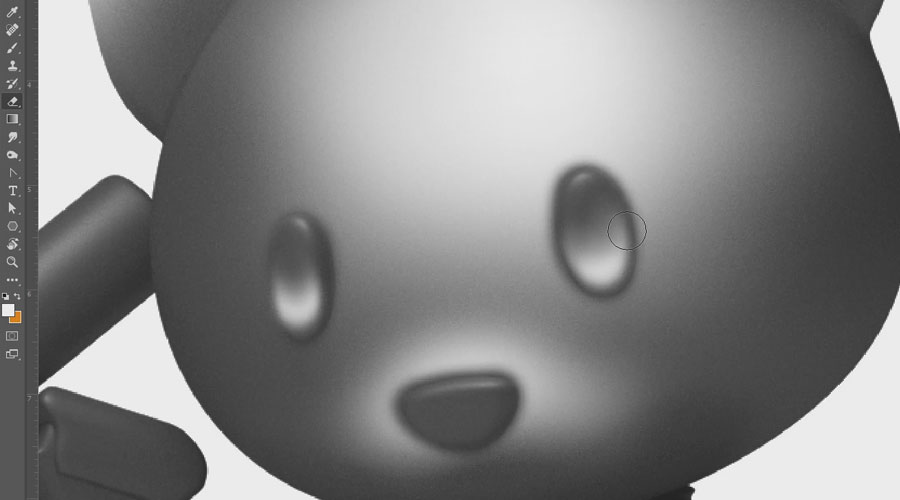
From here on it’s simply a matter of brushing and erasing, until you get your desired result:
1.3 Creating a Shade Mask Image
To better see the progress of the shades, reduce opacity of the Layer group to around 50% and drag the group below the Transparency group:
Just like before, select the Shade group and create a new blank layer. This time we’ll be painting with black, so double-click the background colour icon and change it to a brighter grey, to better see the progress:
Then simply change the primary colour to black and start painting:
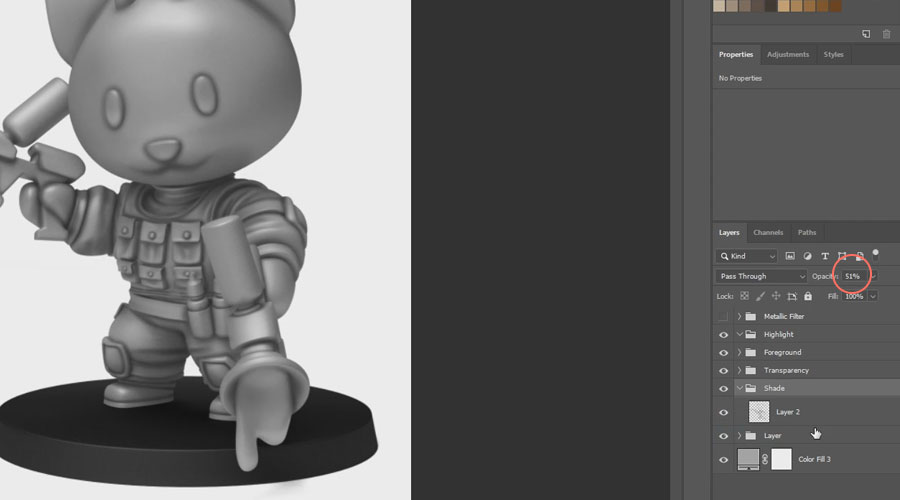
Once you’re done, also reduce the Shade group’s opacity and move it below the Transparency group:
1.4 Creating a Highlight Mask Image
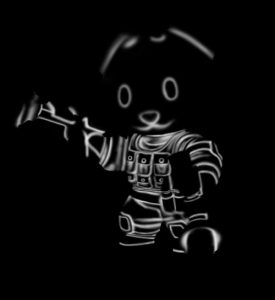
Switch the background colour back to a darker grey and once again create a blank layer, but this time inside the Highlight group:
Change the primary colour back to white and start painting:
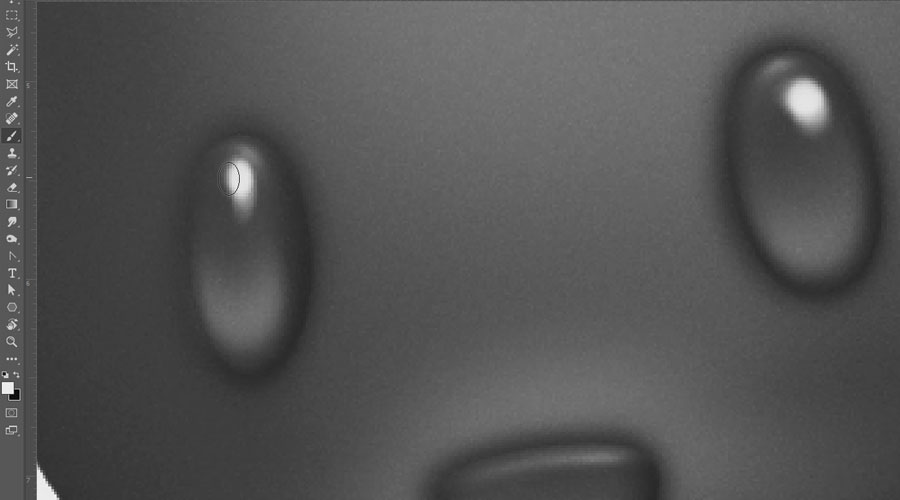
Once you’re done, also drag the Highlight group below the Transparency group.
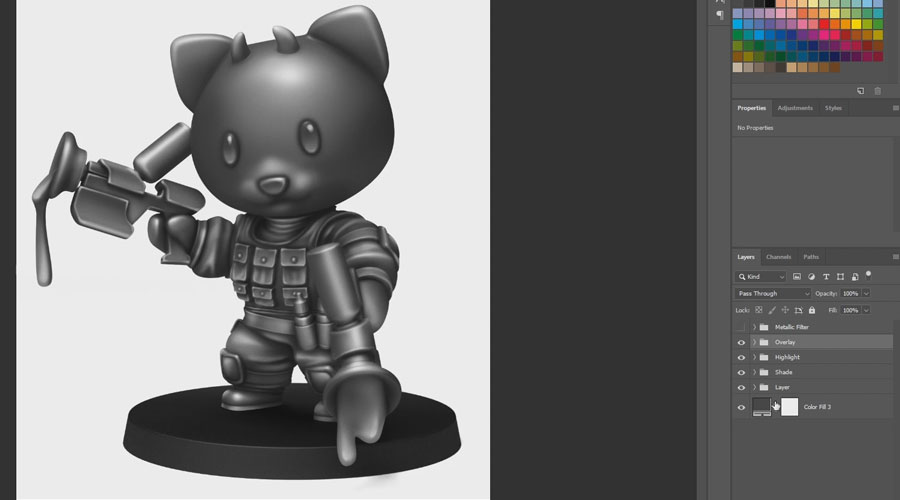
To simplify the file some more, group Foreground and Transparency to an Overlay group:
1.5 Creating a Metallic Filter Image
Make sure your Metallic Filter group’s display mode is set to Overlay, instead of Pass Through:
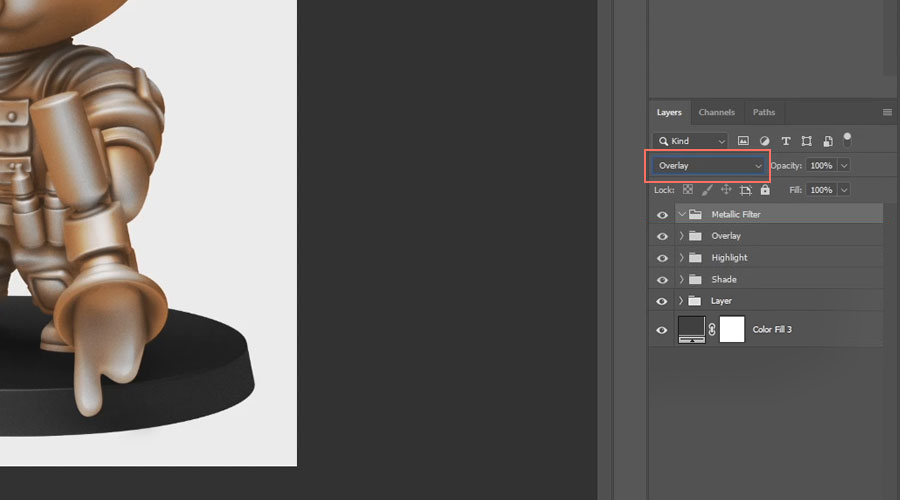
Create an ochre colour layer right above the Highlights group and set its display mode to Colour, to give your image a golden tint. This will help visualize the effect of your metallic filter:
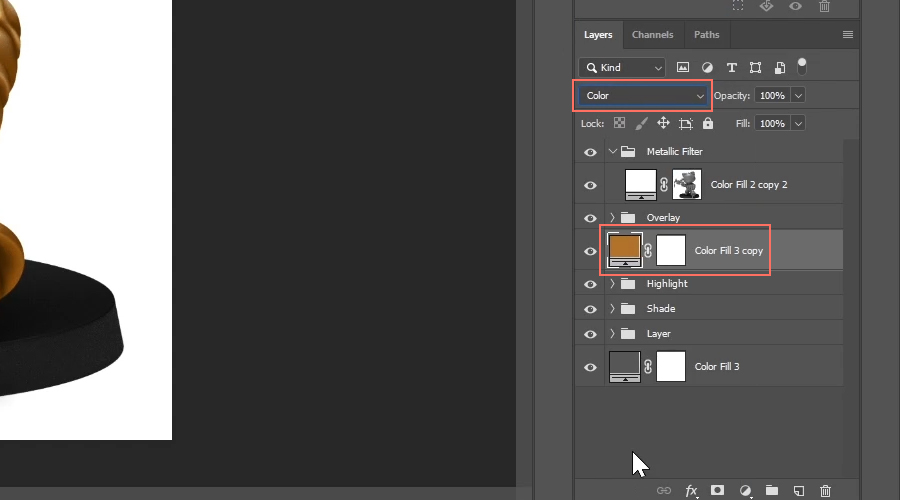
Then, inside the Metallic Filter group, create a grey colour layer with a brightness level of 50%. This perfectly neutral grey will be the base colour of your filter without affecting your image:
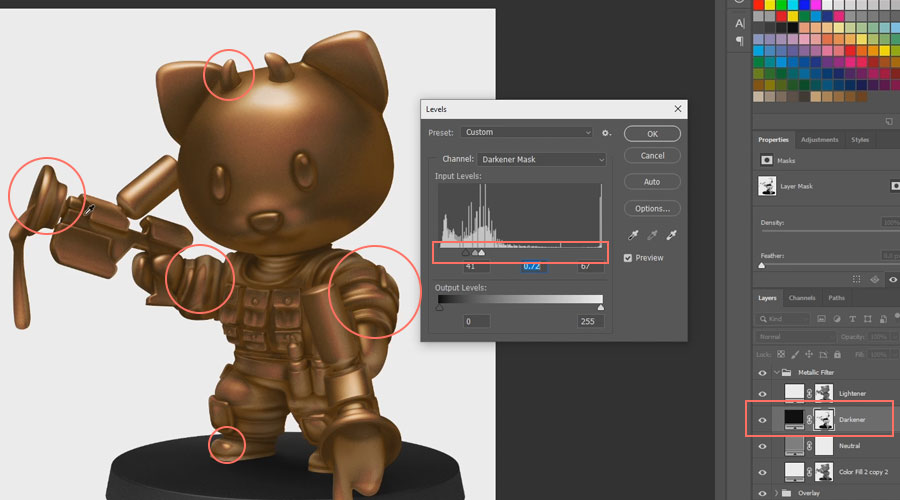
Place 2 duplicates of your Lighting backup right above the grey base colour (by Alt-dragging “Color Fill 2 copy 2” to the top of the group) and set the bottom duplicate to Black. Since the following steps are irreversable, keep the original backup below the grey base. it will be invisible, but you will still have a backup to restart from, in case you’re unsatisfied with your result:
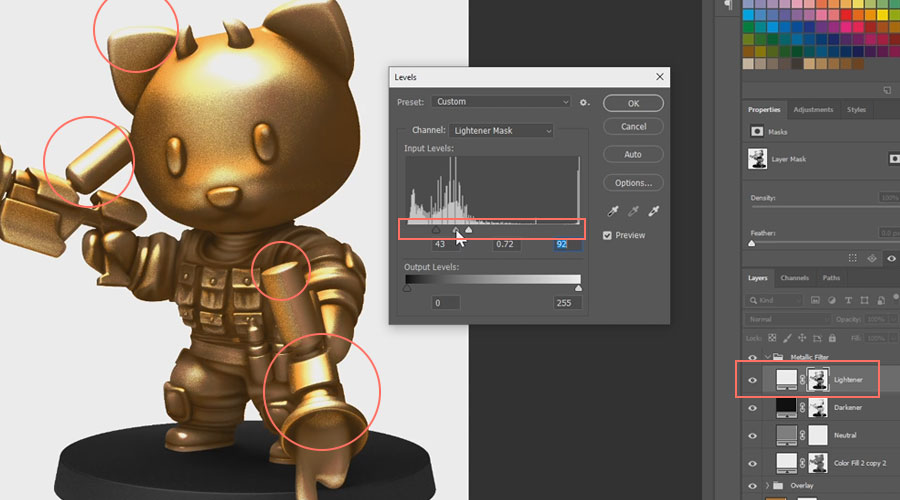
Rename the white and black layer to Lightener and Darkener. These will do the entire metallic magic for us. All we need to do is tweak around their contrasts. Click on the opacity mask of the Darkener and press Ctrl+L. Move the left slider a bit to the right, and the right slider way to the left. Your goal is to create 3-step-highlights, where midtones get darker before actually becoming brighter:
Once you’re happy, confirm your settings. Click on the opacity mask of the Lightener and once again press Ctrl+L to adjust the contrasts. This layer’s job is to create extreme highlight reflections by amplifying the natural specular highlights of your photo:
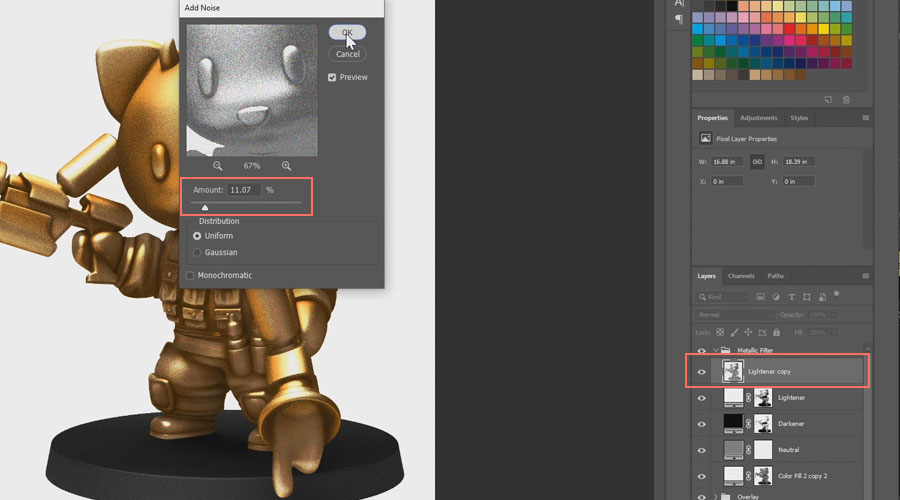
As a final touch, let’s add some metal flakes. Shift-select the Lightener, the Darkener and the grey layer. Alt-drag them to the top of the group and press Ctrl+Alt+Shift+E to merge them.
Then go to Filter > Noise > Add Noise… . Depending on your images resolution the ideal value varies, but for about 1200 pixels, 5 to 10% should do:
1.6 Creating the a selection map

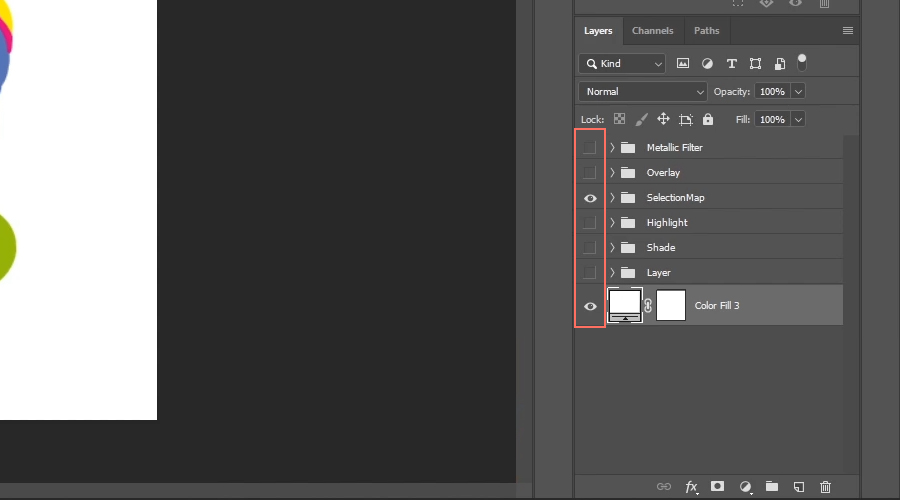
Hide the Layer, Shade and Highlight group, and create a new group named Selection Map, right below the Overlay group, with a blank layer in it:
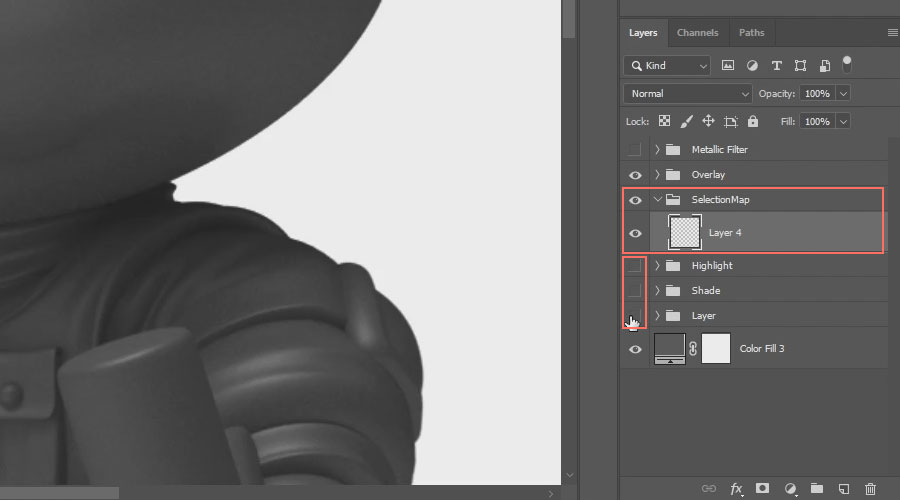
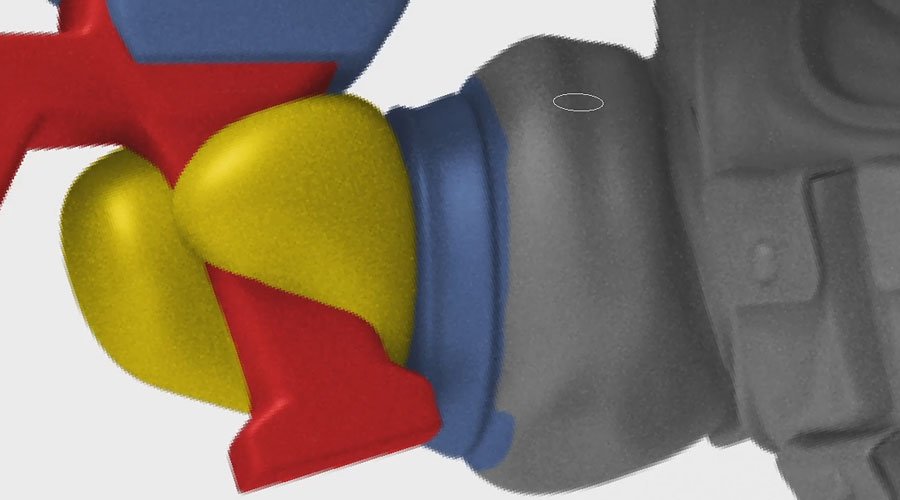
Paint the areas you’d like to set as individual selection areas in different colours. Make sure to use colours that are not too similar. Also paint slightly beyond the border of the model (although you won’t see it as long as the overlay group is above it):
Once all your sections are defined, you need to clean up the borders. The quickest way is to take the silhouette you already defined at the beginning. So open up the Foreground group and Ctrl-click the mask icon of the Colour Fill:
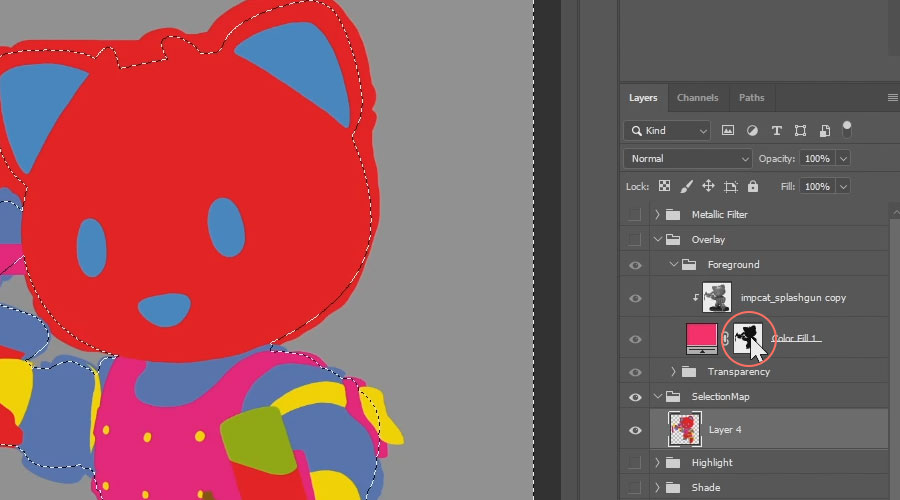
Create a new white Color Fill layer in your Selection Map group, based on that selection, and also a fully filled (without having anything selected) black Color Fill layer below it. Since the selection map should extend the actual model by a few pixels, give the white layer a black inner border by selecting it, pressing the Add a Layer Style button at the bottom of the Layers window and selecting Stroke… . Set it to black, 2 to 4 px in size, 100% Opacity and Position Inside:

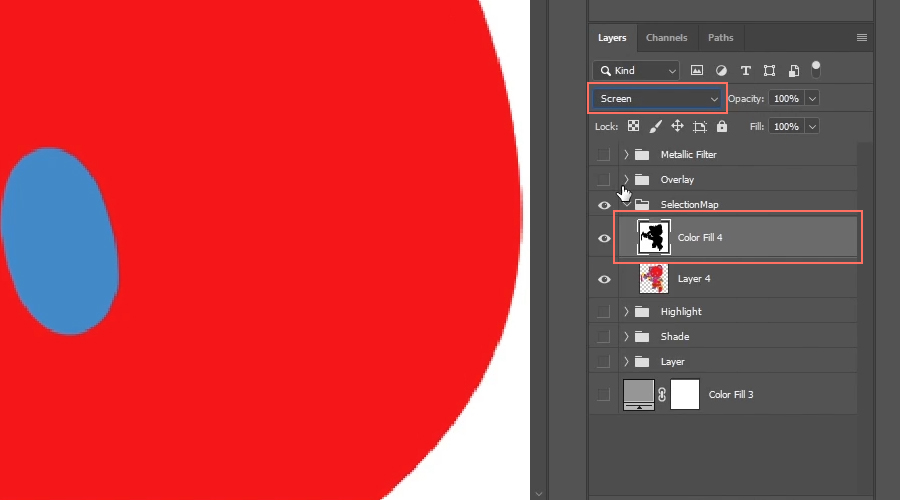
Shift-select the white and the black layer and press Ctrl+E to merge them. Then change the display mode from Normal to Screen:
Select the painted map layer and press B to use the Brush Tool to clean up the entire image. While using the Brush Tool, you can hold the Alt key to temporarily use the Picking Tool and change the colour you’d like to paint with. Make sure that the only colours visible are those you actually want to use as selection areas:
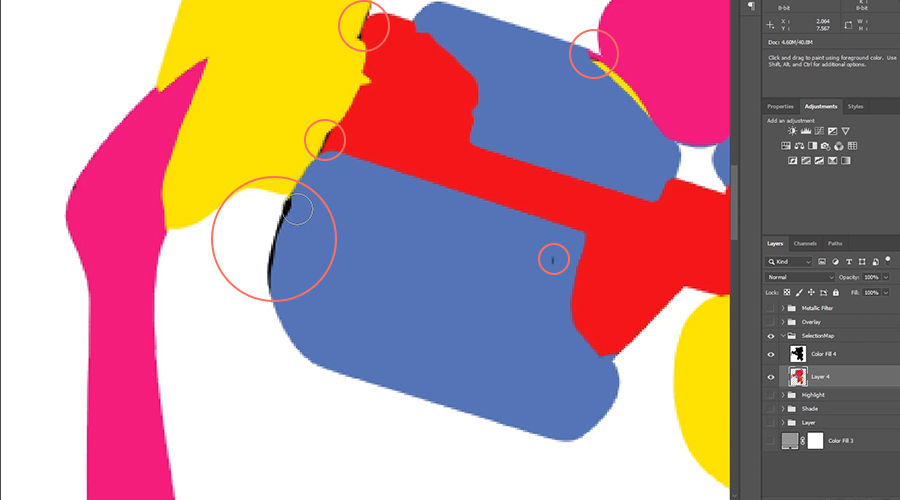
Once you’re finished, the selection map should have a bigger margin than the overlay image.
1.7 Exporting all images
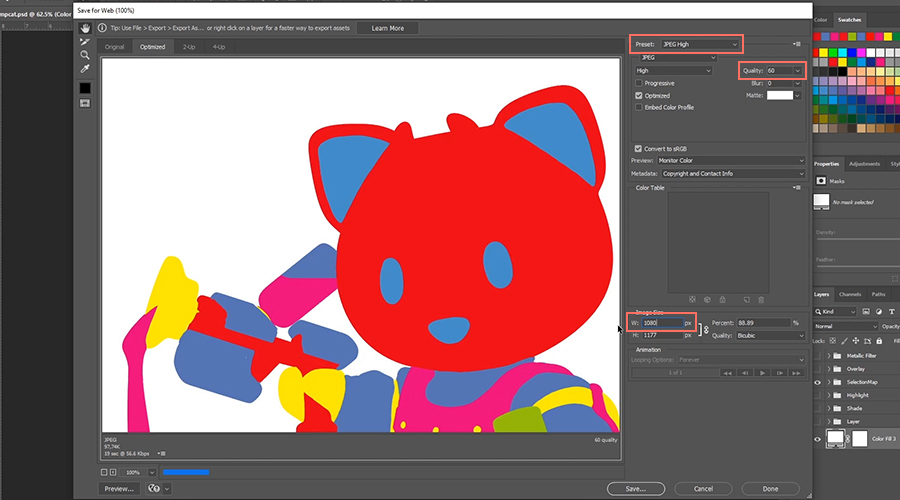
Make sure only the selection map group is visible and press Ctrl+Alt+Shift+S to export it as a JPEG image:
To avoid unnecessarily large file sizes and lag, we recommend setting all JPEG images to a 60% quality and a maximum size of 1080px on the shorter edge. Since the selection map image will be converted in the upcoming process, you can actually leave it at uncompressed maximum quality:
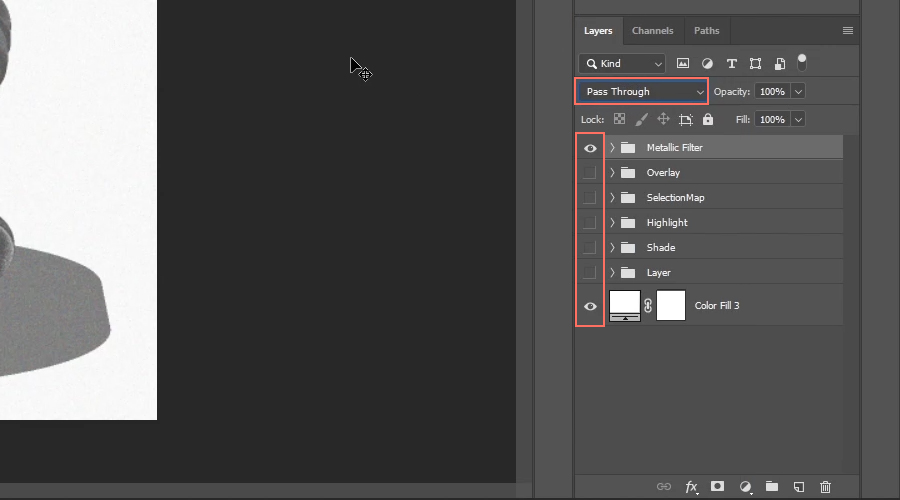
Hide everything except for the Metallic Filter group and set its display mode to Pass Through. Then press Ctrl+Alt+Shift+S to export it as a JPEG image.
Make sure to give all your exported images a distinctive file name suffix, like “M” for Metallic:
Set up a black background and hide all other groups except for Highlight. Make sure its opacity is set to 100%. Then press Ctrl+Alt+Shift+S to export it as a JPEG image:
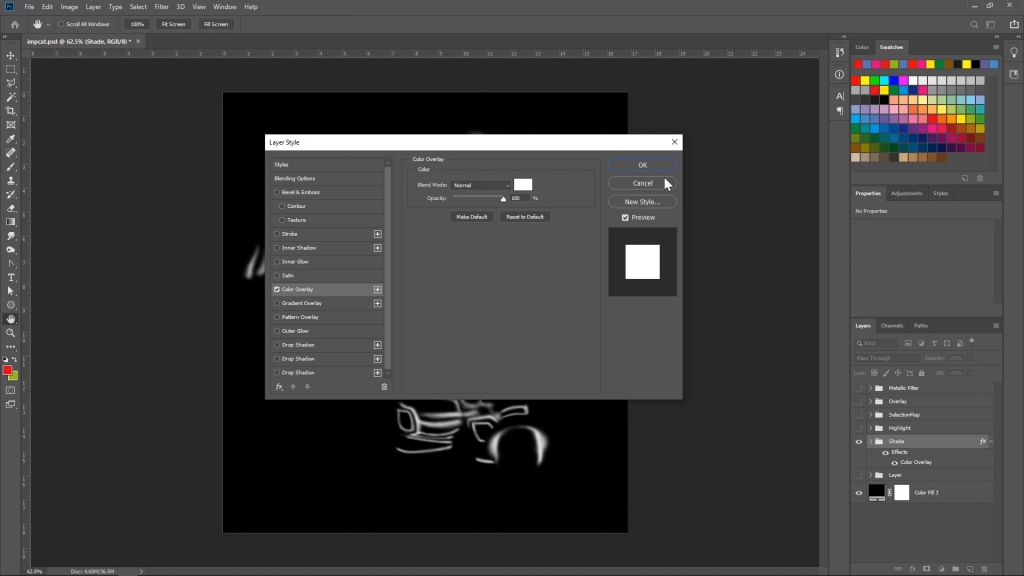
Hide all groups except for Shade and make sure its opacity is set to 100%. Because we painted the shades with a black colour, it will be invisible on the black background, so double-click the group (the blank area around the layer’s name) to give it a white colour Overlay effect at a 100% opacity. Then press Ctrl+Alt+Shift+S to export it as a JPEG image:
Hide all groups except for Layer and make sure its opacity is set to 100%. In case you used any other colours than white, also double-click the group to give it a white colour Overlay effect at a 100% opacity, as you did with the Shades group. Then press Ctrl+Alt+Shift+S to export it as a JPEG image:

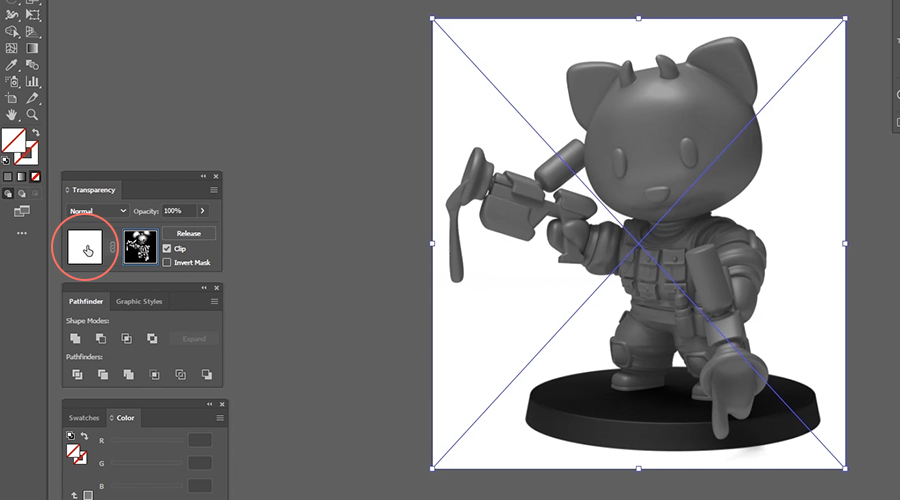
Hide everything except for the Overlay group and press Ctrl+Alt+Shift+S, but this time use PNG 24 as the preset and make sure the Transparency checkbox is checked, so the colours can actually shine through. Otherwise your will just end up with a static picture of a white model:

2. SVG Setup
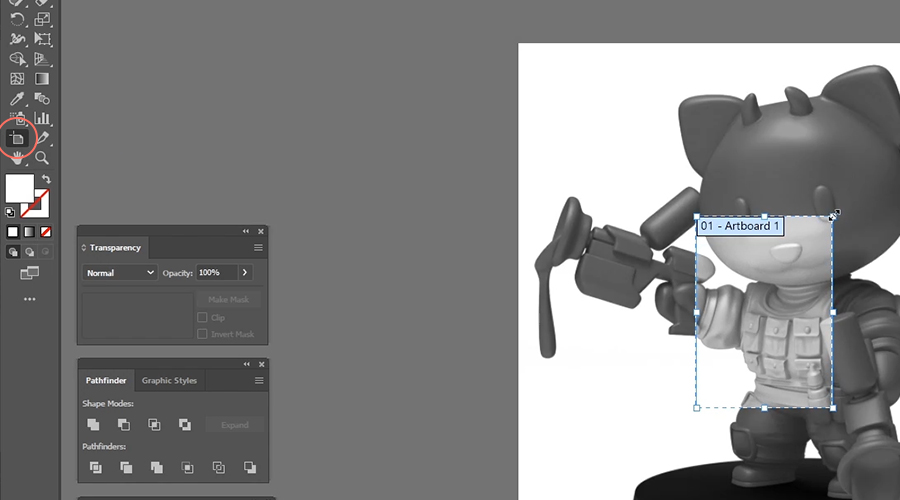
Open the Overlay image in Illustrator and adjust the canvas size to the image. To set it up precisely, press Ctrl+U to activate auto-aligning snapping:
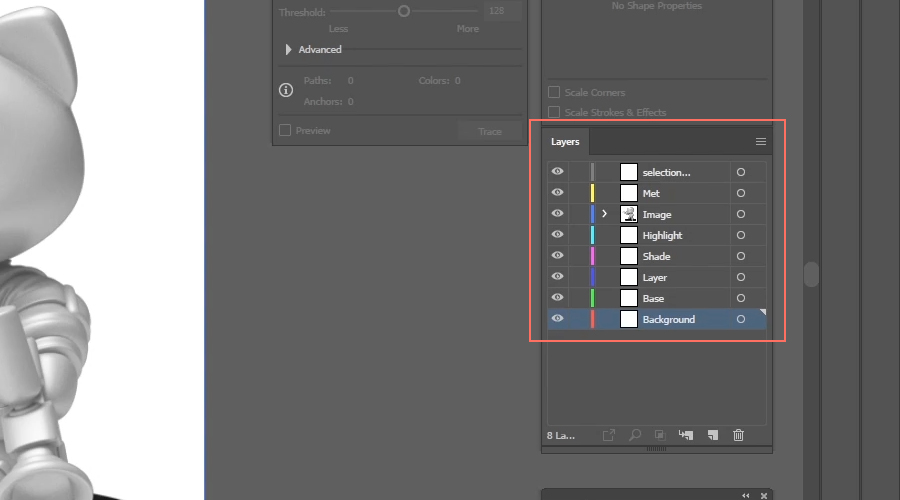
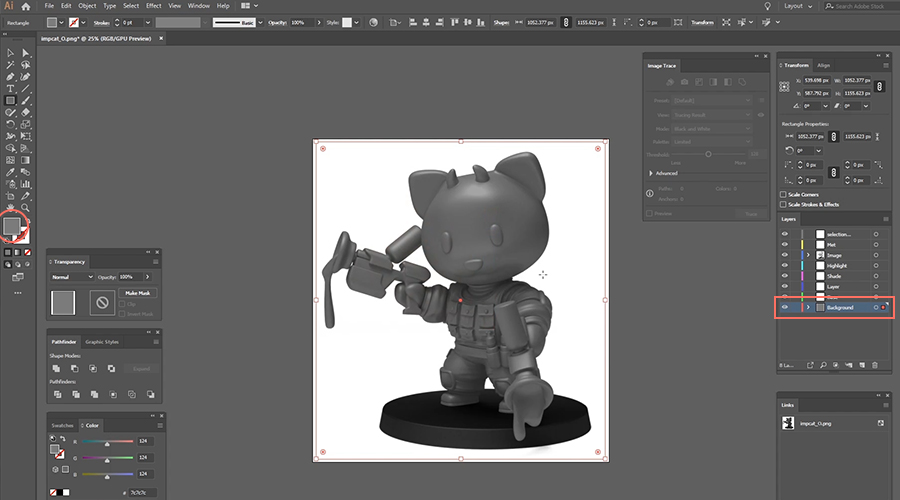
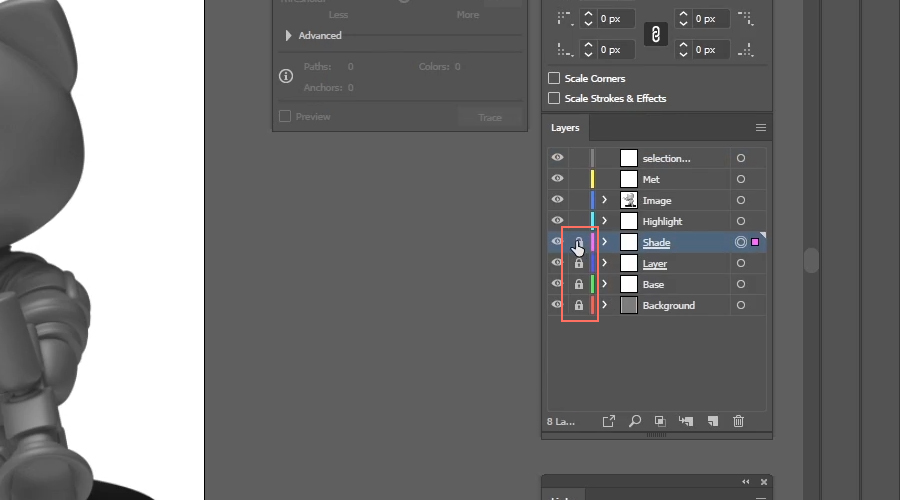
In the Layers window, rename the image’s layer to Image. Then create 7 additional layers. Make sure the Image layer is the 3rd from the top and rename the others from bottom to top: Background, Base, Layer, Shade, Highlight, Met, and selectionMap, exactly in that order and exactly in that writing. Wrong naming will result in the layers not working inside the app:
Select the Background layer and use the Rectangle Tool to draw a rectangle that covers up the entire model. Set its fill colour to a medium grey. This will be the model’s initial colour when it’s being loaded inside the app:
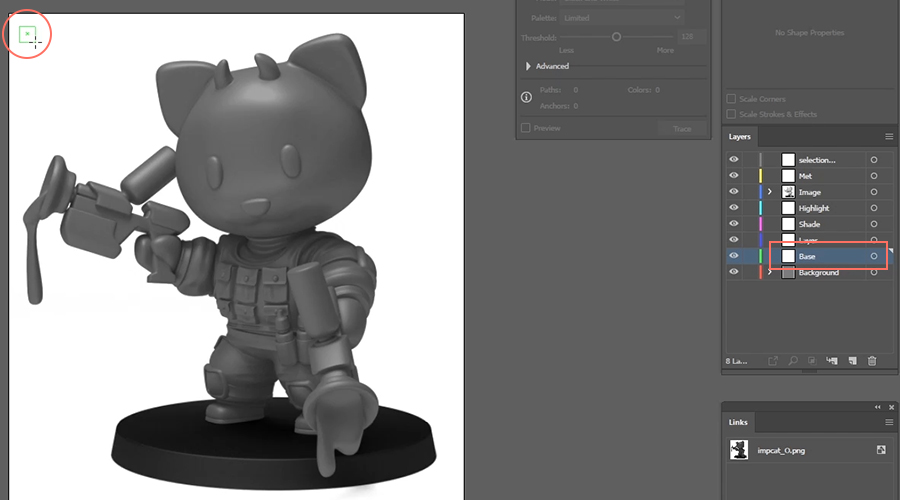
Select the Base layer and make sure the Background rectangle is no longer selected. Draw a tiny element like a rectangle in an area that’s completely covered up by the overlay image and make its fill colour blank. Since this layer will basically stay empty, this element will ensure that the layer will not get deleted in the exporting process (yes, unfortunately Illustrator does that to empty layers):
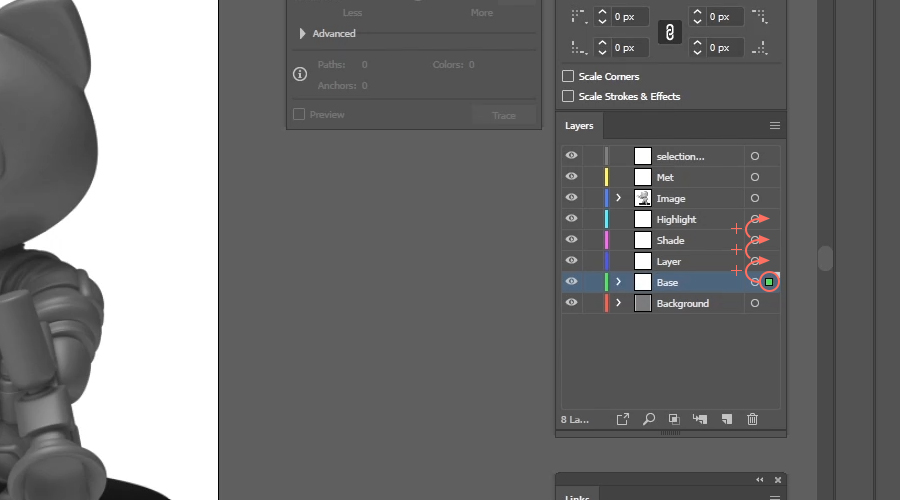
Alt-drag the little coloured indication marker to the upper 3 layers to duplicate the element to those layers as well:
Click the little circle of Layer and double-click the mask icon in the Transparency window to apply an opacity mask to the entire layer. Then drag and drop the layer mask image into the scene and align it to the center of the canvas:
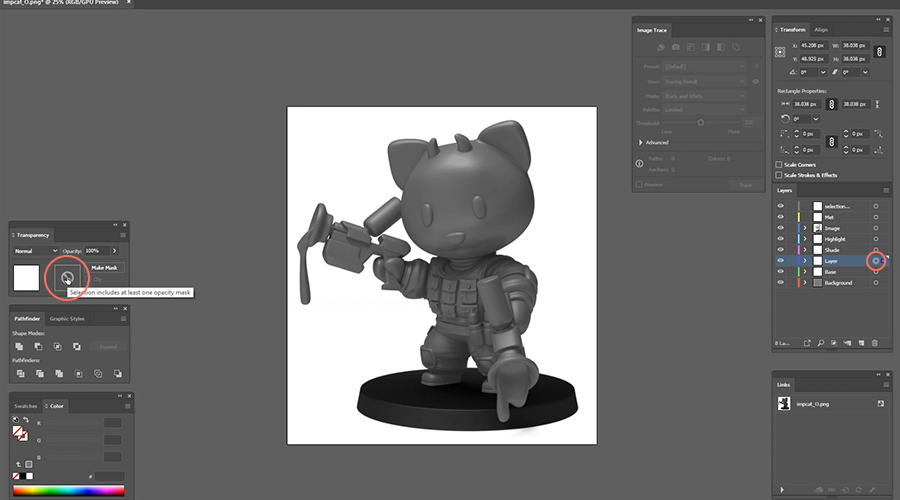
Note: In case you’re wondering why you can’t see the layer mask image: It’s a layer mask image. It merely defines what is and what is not visible inside the layer it’s been applied to. Since there is no content in this layer (except for the tiny blank rectangle you just placed in the corner), the mask basically manages the opacity of nothingness.
Then click the canvas icon in the Transparency window to exit the mask mode:
Repeat this for the Shade and Highlight layers with their corresponding mask images.
The edited layers can be locked to avoid any unintentional changes:
Unlike the previous 3 layers, the metallic filter layer (Met) must have a blank mask. The metallic filter image must be dropped directly onto the canvas and not into the mask, so create an opacity mask and leave mask mode immediately:
Note: At this point Illustrater may have applied the mask to the metallic filter image instead of the Met layer, depending on whether the filter image was selected while creating the mask. So expand the Met layer and select the image. If the Transparency window shows you that the metallic filter image has a mask, press the Release button in that window to remove it. Otherwise the filter will not work. Then click the Met layer’s little circle marker and make sure it has a mask.
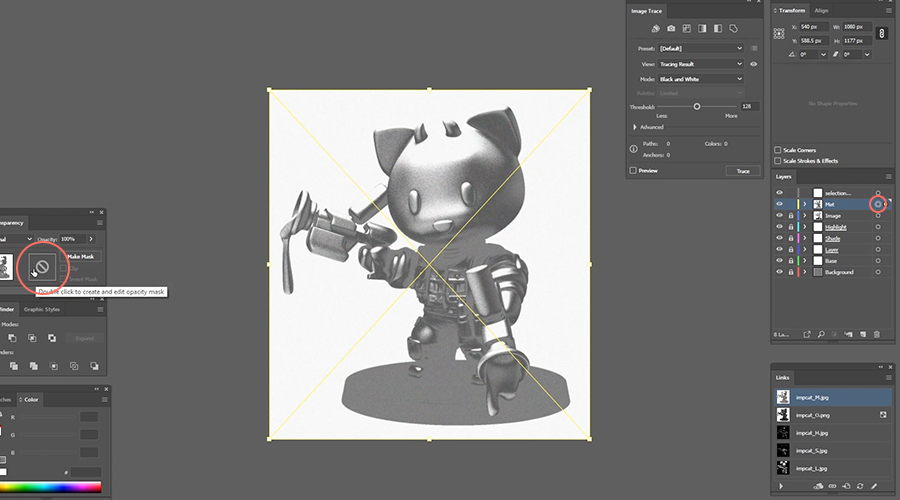
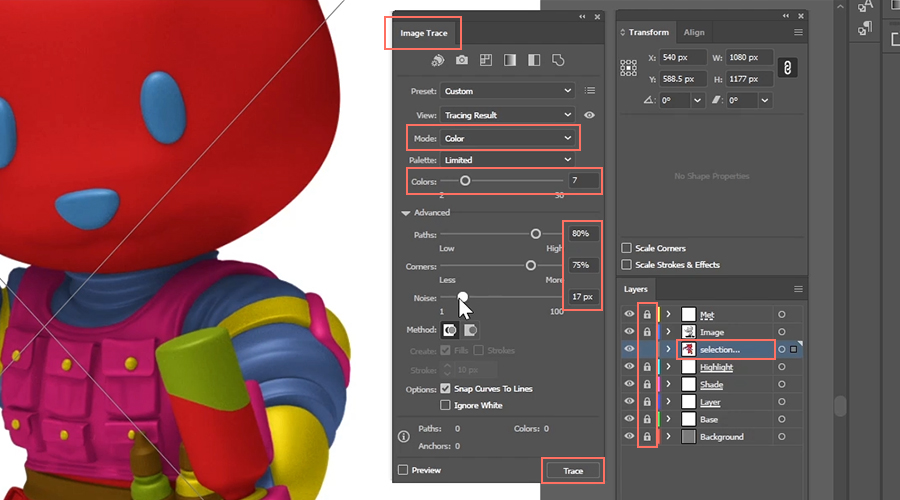
Lock all layers except for selectionMap and drop the selection map image here. Align it to the center and place the layer below the Image layer (temporarily). With the selection map image selected, go to the Image Trace window (go to Window > Image Trace to open it up) and set the image trace Mode to Colour. Assign the amount of different colours you used, including the white background (so the colours you used +1). Then unfold the Advanced options, set Paths and Corners to around 80 and Noise to around 10 and press the Trace button:
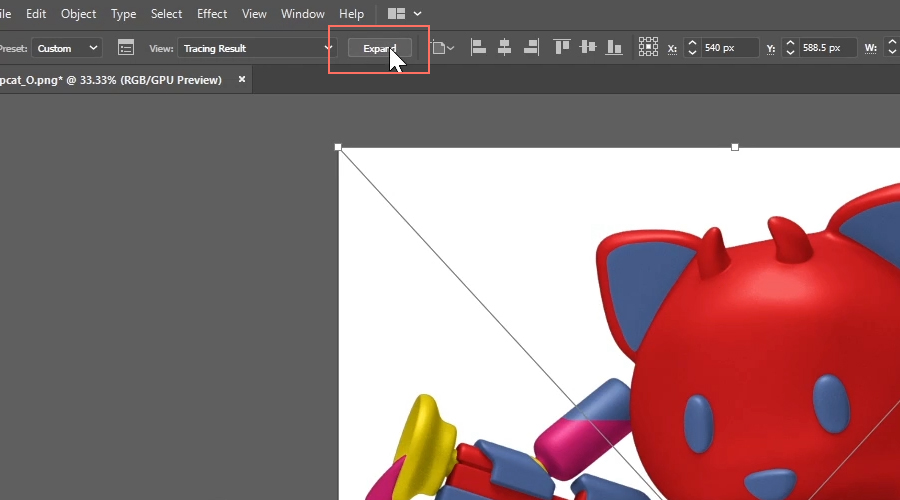
Depending on your images’ resolution this may take a few seconds to compute. Then press the Expand button to convert the result into vector paths:
Now you just need to reorganize your selection areas. After expanding the traced image all paths will be collected in a group. Press A to use the Direct Selection Tool for selecting individual components inside that group. Shift-click to select components you want joined as a collective selection (e.g. all areas that show skin). Turn them black to distinguish them as “edited”. This will help you keep track of your progress:
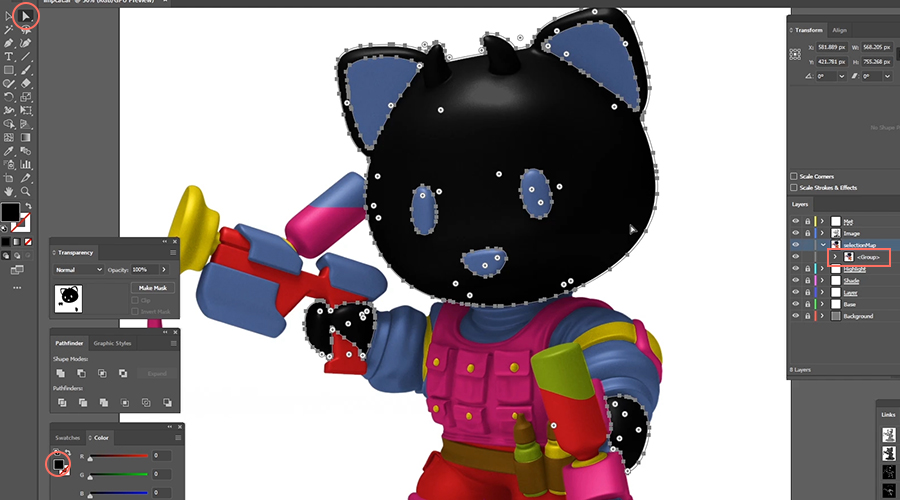
Then press Ctrl+X to cut them out, Ctrl+F to paste them at the same coordinates, but outside the original group, and Ctrl+G to join them in a new group. Then rename the new group to unique identifyer like “Skin1” (important: no spaces or special characters!):
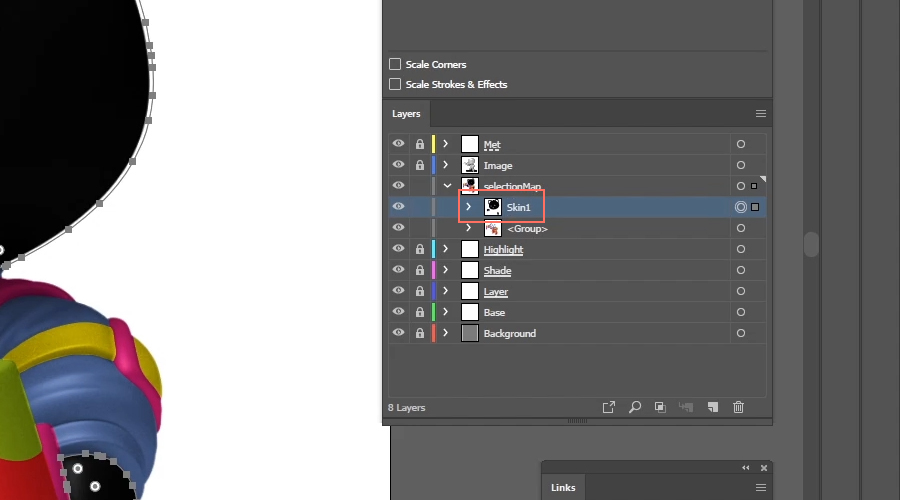
Repeat this process for all paths, until the entire model is black. Once you’re done, there will be a few useless artefacts left in the original group, so simply delete that group:
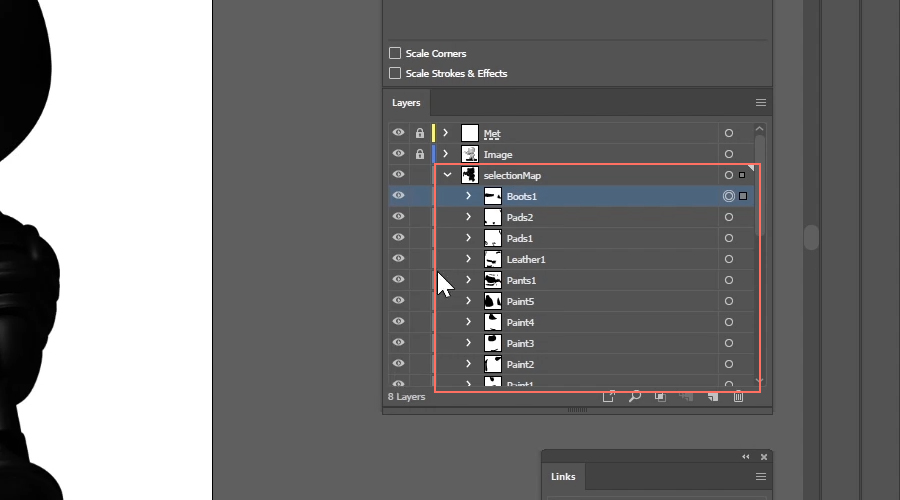
Note: the selectionMap layer should now consist of a list of groups with unique names, and inside each group should exclusively be one or multiple path elements. This is crucial and any other structure will not work inside the app.
Before exporting your SVG file, make sure selectionMap is the top layer again and all the paths in it have a blank fill colour:

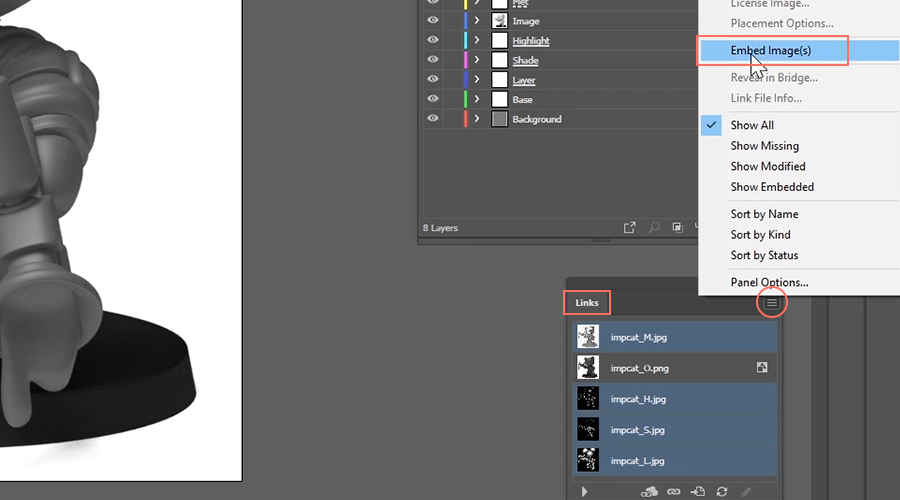
Unlock all the other layers and embed all linked images in the Links window. Since the Overlay image was the base of this document, it already is embedded, so make sure it’s not selected when embedding multiple links:
Note: In case you want to make manual adjustments to your traced image, just draw new components onto the scene. Once you’re done, these need to be merged using the Unite tool from the pathfinder window. Also you’ll need to subtract the new content from the existing one, using the Merge tool from the Pathfinder window. After these edits, you’ll need to rearrange your groups, since all edited components will lose their former group structures.
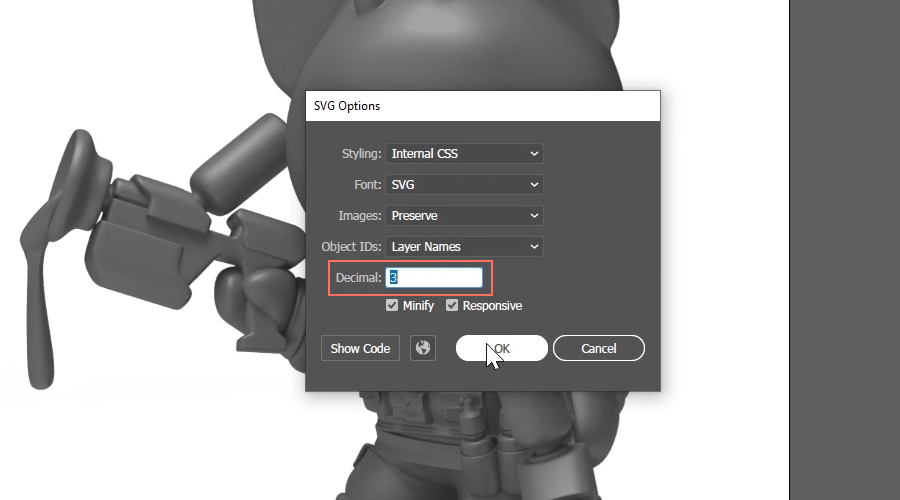
When everything is finished, go to File > Export > Export As… and save the file as an SVG with a Decimal value of 3:
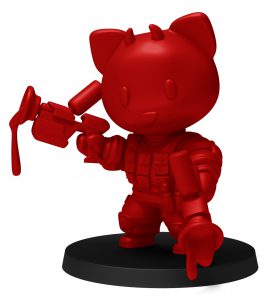
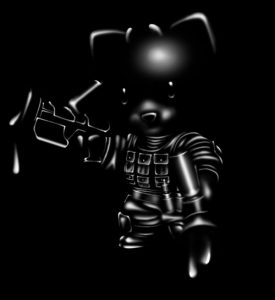
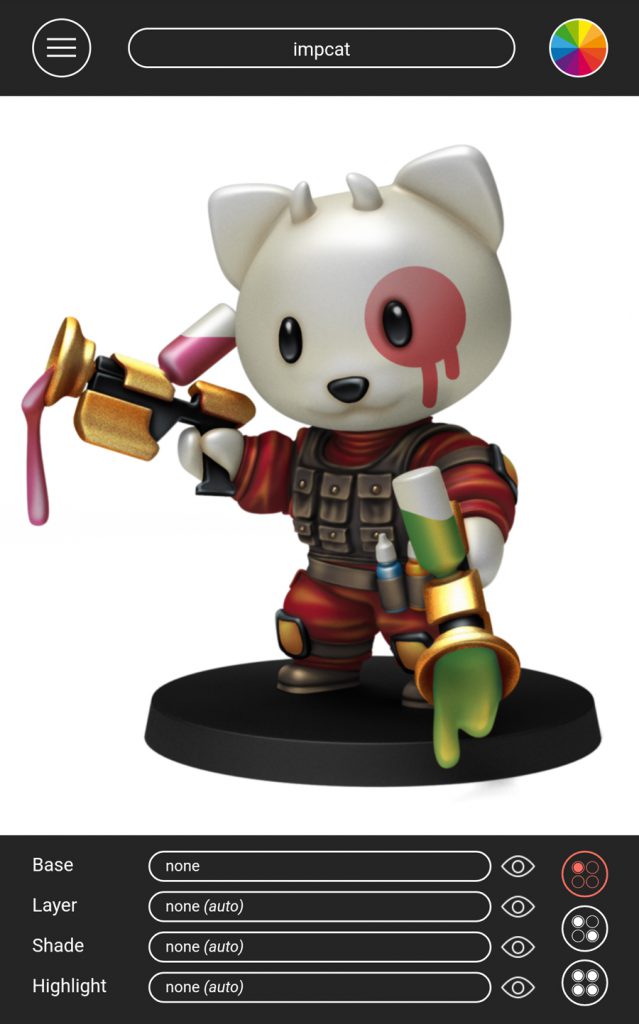
Result
If you followed these steps correctly you should now have a fully functional SVG template:
Usage
To import your custom image template into impcat, do the following:
For Android:
Either copy it to the Android/data/com.DesignBench.impcat/impcatDLC/Image-Templates directory on your device
or
copy it to any directory on your device and use the importer that is located in the model selector (positioned right under the first 6 Artel “W” models, called “Import SVG from your device’s storage”), then the file browser should pop up so you can navigate to your file, select it and confirm:

For iOS:
Open your default Files app. It usually starts up in the iCloud folder, so you’ll have to leave that and go to “on my iPhone/iPad”. There you’ll find the impcat location and its subfolders. Once you copy the .svg file to the Image-Templates subfolder and reboot impcat, the new template should be available in the model selector.